


Integration with Woocommerce
User Guide / Integrations / Integration with WoocommerceIntegrating e-Cont.md and Woocommerce
The Woocommerce plugin is worked on Wodpress CMS (Wordpress.org or wordpress.com).
In order to connect your online store to the e-Cont.md system, a number of technical requirements must be met:
1) Your online store must run on the WordPress platform using the WooCommerce e-commerce plugin.
Plugin "e-Cont.md : Electronic Invoice" works in WooCommerce environment.
2) There are two ways to install the plugin "e-Cont.md : Electronic Invoice".
2.1) The first way is to install the plugin in the standard way of installing plugins in WP, namely by downloading it from the WP marketplace.
2.2) The second way is to download the archive with the plugin from the docs.e-Cont.md website using the link.Next, you need to unpack the downloaded archive with the plugin on your online store server to the folder "/wp-content/plugins/e-cont-gateway/".
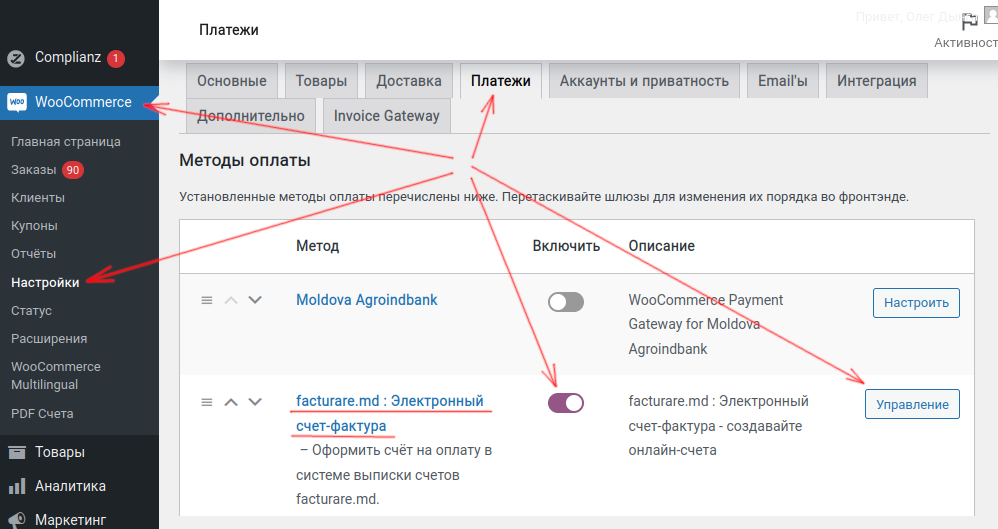
3) After that, in the WooCommerce settings in the "Payments" tab, the "e-Cont.md : Electronic Invoice plugin will appear in the list of available forms of payment ".
Woocommerce (Wordpress) - installing e-Cont.md plugin
There are four ways to install the e-Cont.md widget code on a site running the WordPress.org CMS, and we'll cover each of them below:
Method 1. Installing the widget code through the plugin
This method is suitable for new customers, those who install the e-Cont.md plugin for the first time.
If you already have one site connected in the control panel and you want to connect an additional one, then you need to use any other method from this instruction - installing the plugin will not work in this case.
To install the online consultant plugin on WordPress, you need to open the plugin page in the WP marketplace and download it to your computer via the Download button.
Go to the admin area of your site in Wordpress, section "Plugins" and download the plugin.
After installation, activate the plugin. You can do this by clicking on "Activate Plugin" immediately after installation, or by going to the "Plugins" -> "Installed" -> activate the e-Cont.md plugin.
In order for the chat widget to appear on the site, you must specify the data for connecting the chat to your account:
In the appropriate fields, you must specify your e-mail and password for the e-Cont.md account, as well as the name of the operator.
If you have not yet created an account on our website, then when you enter data, it will be created automatically, or you can specify data from an existing account.
Ready!
Method 2. Installing the code through the Widgets menu
To get started, copy the widget code to your personal account e-Cont.md, section "Management" -> "Communication channels" -> "Settings" under the name of the site -> "Installation". Then open your WordPress admin panel and go to Appearance -> Widgets. Add an HTML code widget.
Paste the copied chat code into the code field and save the changes.
After these simple steps, the chat will appear on your site.
Method 3. Installing the widget code via header.php
After you have copied the widget code from your personal account facurare.md, you need to go to the administration panel of your WordPress site, go to the Appearance -> Editor section.
Select the Header file (header.php) and proceed to edit it.
Paste the widget code right before the </head> tag and click Update File. The chat will be installed.
Method 4: Install via FTP
If the previous methods did not suit you, then there is the possibility of directly modifying the header.php file. To do this, you need to go to the hosting of your site or connect to it through an FTP client and follow the path wp-content/themes/your template/header.php.
Select the header.php file and click "Change" / "Edit". Paste the code before the </head> tag and click Save Changes.
Ready!